
Use Ubuntu Linux with Docker
Introduction
Docker provides a lightweight and efficient way to run Ubuntu in isolated containers, offering the flexibility of a full Ubuntu environment without the overhead of traditional virtual machines. This approach enables developers to quickly spin up consistent Ubuntu instances for development, testing, and deployment purposes. With Docker, you can package your Ubuntu-based applications with all their dependencies, ensuring they run reliably across different environments. This guide will walk you through the process of installing Docker, pulling the Ubuntu image, installing custom apps, and create your own image to quickly get go anytime.
Run Ubuntu Image within Docker
The following are the steps that I followed on my MacBook (M1) to start using Dockerised Ubuntu – start/run when you need it and stop it when the job is done.
Step 1:
Install docker
brew install --cask docker
Step 2:
Pull publicly available ubuntu image. I have used latest tag
docker pull ubuntu:latest
Step 3:
Docker containers are meant to be ephemeral. Therefore, it’s always a good idea to create a Docker volume for persistent storage and attach it to the container.
docker volume create ubuntudata
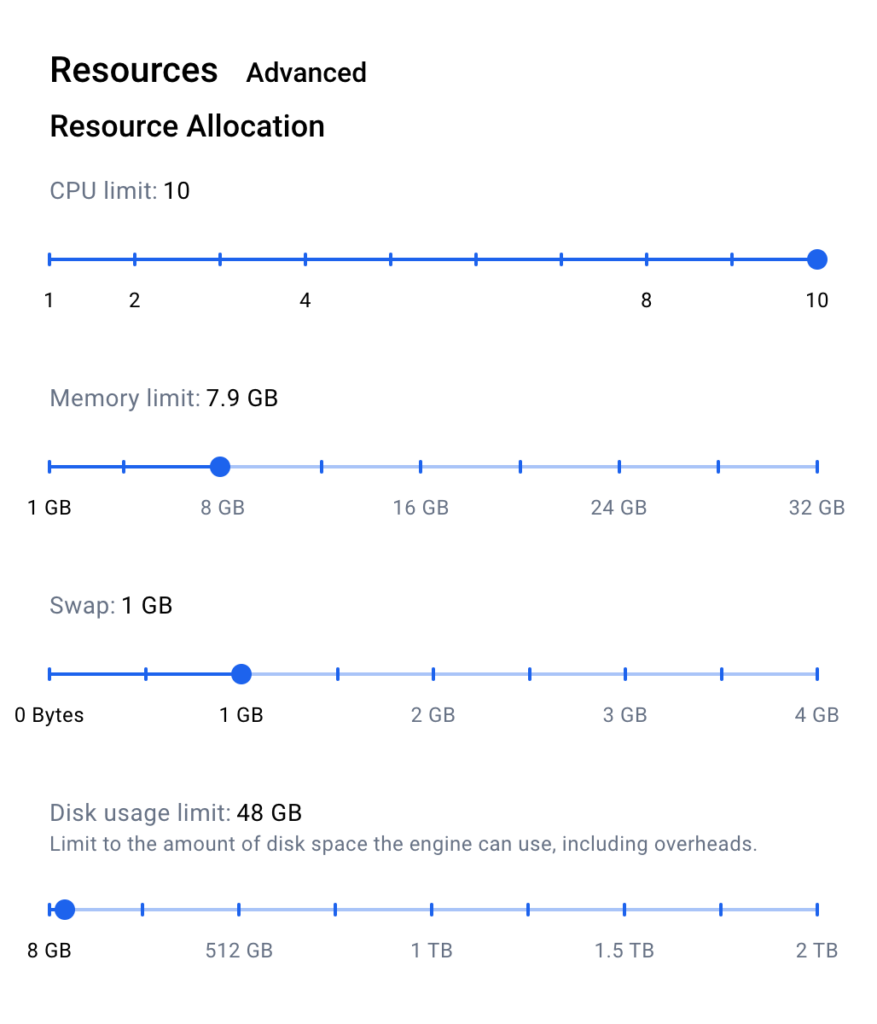
By default, Docker will create a 1TB volume. This can be managed with Docker Desktop (Setting → Resources). Max disk usage limit can be set to the desired limit as shown in the picture.
Step 4:
Now run Ubuntu with that volume
docker run -it \\
  --name myubuntu \\
  -v ubuntudata:/data \\
  ubuntu:latest \\
  bash
After exit, the container will stop, but we can get the ‘Container ID’ of the stopped container with the docker ps -a command and then use docker start <container id> -i to resume using Ubuntu.
You should see the /data mountpoint within Ubuntu:
root@42c68df7759b:/# df -h /data
Filesystem      Size  Used Avail Use% Mounted on
/dev/vda1        47G  4.3G   41G  10% /data
root@42c68df7759b:/#
Step 5:
Install applications that are required on a regular basis. In my case, I have installed AWS, Git, OC, Vim, Curl, etc. (OpenShift) CLIs as a minimum. I’ve shown a few examples below.
apt update
apt upgrade -y
apt install wget curl vim git -y

## Install aws cli
## As I am running Docker on Mac M1, I had to download aarch64.zip
curl "<https://awscli.amazonaws.com/awscli-exe-linux-aarch64.zip>" -o "awscliv2.zip"  ## See Comment 1 below

unzip awscliv2.zip
./aws/install
aws --version

## Install openshift

curl -o oc.tar.gz <https://mirror.openshift.com/pub/openshift-v4/clients/ocp/latest/openshift-client-linux-arm64.tar.gz>
tar -xvf oc.tar.gz
mv oc /usr/local/bin/
mv kubectl /usr/local/bin/ 2>/dev/null || true
chmod +x /usr/local/bin/oc /usr/local/bin/kubectl 2>/dev/null || true
oc version --client
<aside> 💡
- if curl download does not run succesfully for certificate issue. Download it in local mac, and then copy within ubuntu instance with
docker cp <source file with path in mac> <container_name><folder path within container>Example:docker cp ~/Downloads/awscliv2.zip myubuntu:/root/</aside>
You may wish to install all other applications/binary you would require.
🚨 Create your own Ubuntu Image
This is an important step. After all customisation and installation of ad hoc applications and binaries, if we don’t commit our changes/updates by creating a new image, next time we may lose all installations and need to start from scratch.
docker commit myubuntu myubuntu-image

# To start the saved container
docker start -i myubuntu
Push your customised image to dockerhub
docker login

docker tag myubuntu-image <dockerhub username>/myubuntu-image:latest

## Example (in my case)
docker tag myubuntu-image thesatwik/myubuntu-image:feb26

## Verify
docker images | grep myubuntu

## Push it to dockerhub
docker push thesatwik/myubuntu-image:feb26
Conclusion
In this article, I’ve shared my experience using Dockerised Ubuntu. In my opinion, this approach is more lightweight and makes better use of my local Mac resources compared to running Ubuntu through VirtualBox. Note that Dockerised Ubuntu doesn’t provide a graphical interface – so if that’s something you need, using Ubuntu through Docker may not be the right option.